Git for Network Admins
Estimated time to read: 16 minutes
- Originally Written: September, 2026
Overview
I've written a few posts on Cisco Network As Code which makes it easy for users to gain the benefits of programmability and Infrastructure as Code with minimal effort. This post is to explain some of the Git commands you can use to version control the Terraform/NaC config. I've tried to keep the commit/push and the rollback processes simple and not show all the options. Since I'm not a software developer and don't work with these tools every day I try to keep it simple.
Git vs Github
Git is the underlying software which track the file changes and Github is a centralized hosting platform to store your projects (NaC/Terraform config in this case). You use the tool (Git) to push your files into the platform (Github).
There are also other centralized platforms such as Gitlab and Bitbucket. All these platforms (Github, Gitlab, Bitbucket) include added benefits beyond just the version control.
- Version control
- Collaboration across different teams
- Comments/discussions on projects
- Approvals
- Governance/security policies
- Automated workflows
To get started there are a few key components to understand.
The process.
I've tried to include the main steps and commands I use when working on different projects. It will also depend on whether you work on a project alone or with a team of people. I'm not a software developer so please let me know if any of this is wrong so I can updated it. I've also spoken with some network admins who have a software development/automation practice in their organization and get some help from these teams when they run into issues. AI tools also should be able to help here. If all else fails there's always a relevant XKCD.
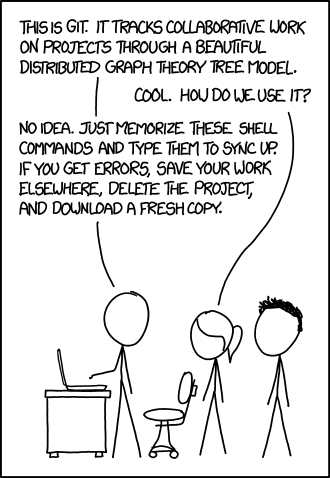
Reference: https://imgs.xkcd.com/comics/git.png
Getting setup
There are different first steps depending on how you're working with Git/Github. In this example I'm assuming you're using Github and already have an account.
Starting something new
If you're starting from scratch you can create a new repository in Github and provide the setup details.
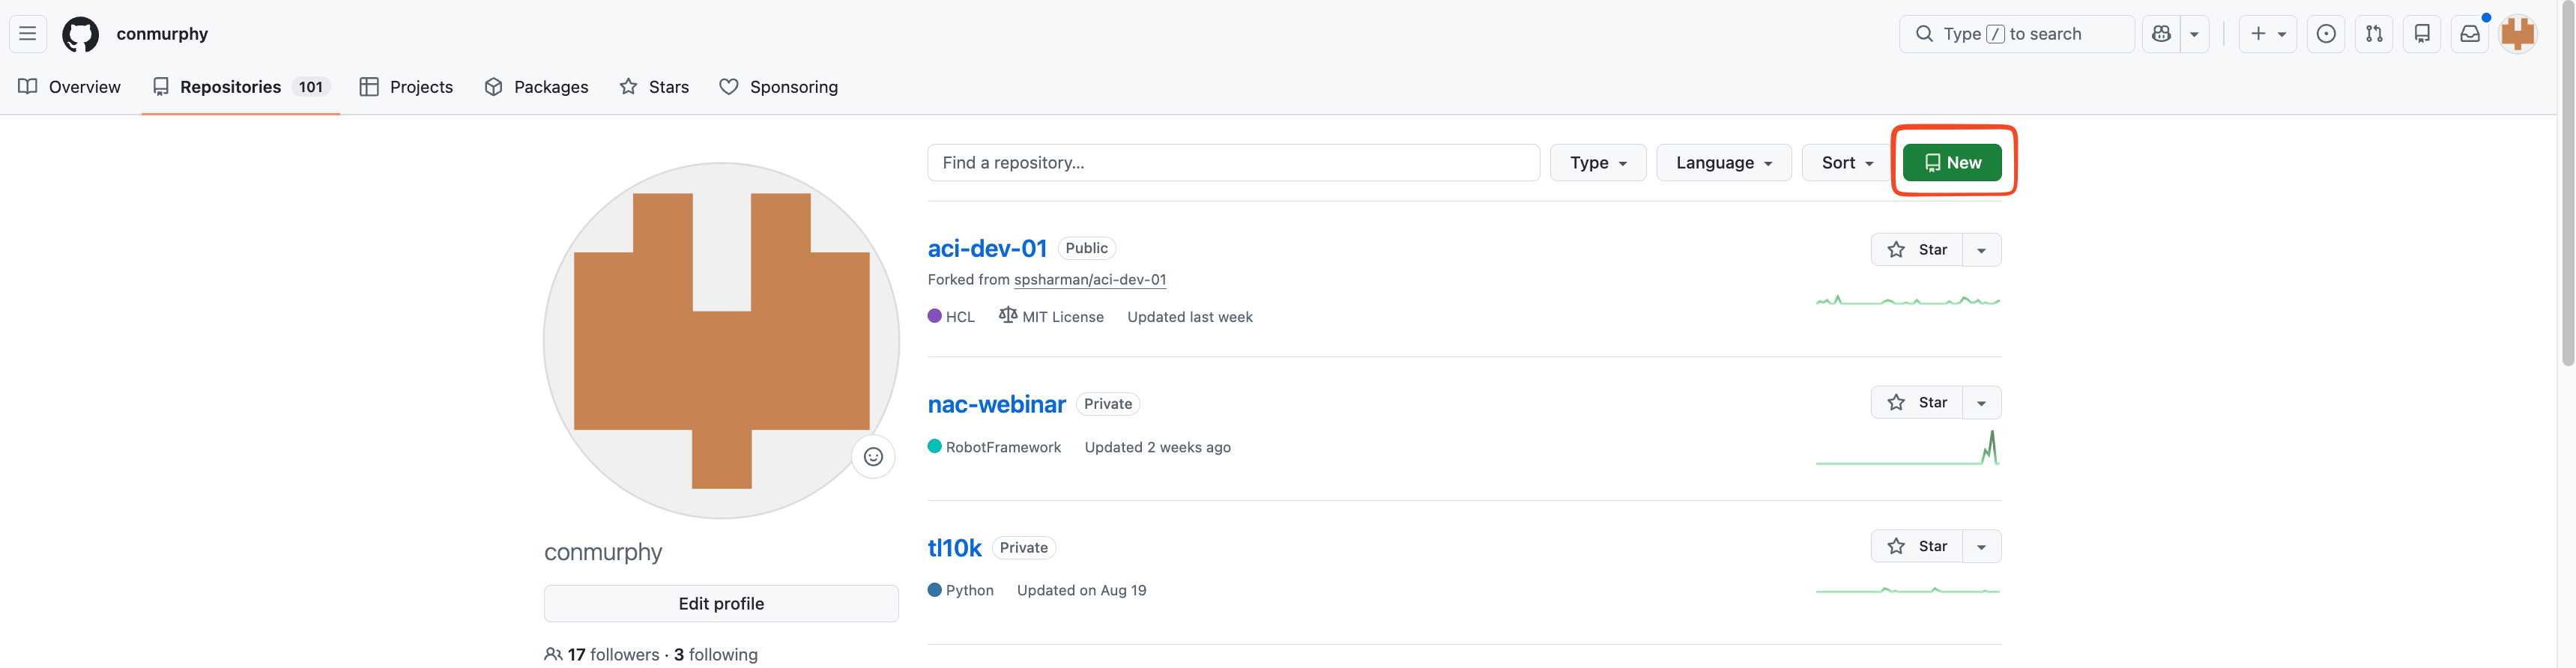
You can select whichever options you require and you can always change them later. Here are a few points to get you started:
- Adding the README will just create an empty file called
README.mdin the repo. You still need to write it yourself - As you'll see later, you can select which files you push to Github. There are some files which you may not want at all (e.g. local environment variables, secrets). When you add the names/extensions of these files to a file called
.gitignore, Git won't ever push them to Github. - You can find more examples of the
.gitignorehere: https://github.com/github/gitignore and you can add whatever custom filenames/extensions to you.gitignorefile. - Depending on what you're working on you may want or need a license. https://choosealicense.com/ is one example of a page which can help guide you through selecting an appropriate one. If this is a work related project you should also check with your organization if there's a specific license you'll need to use.
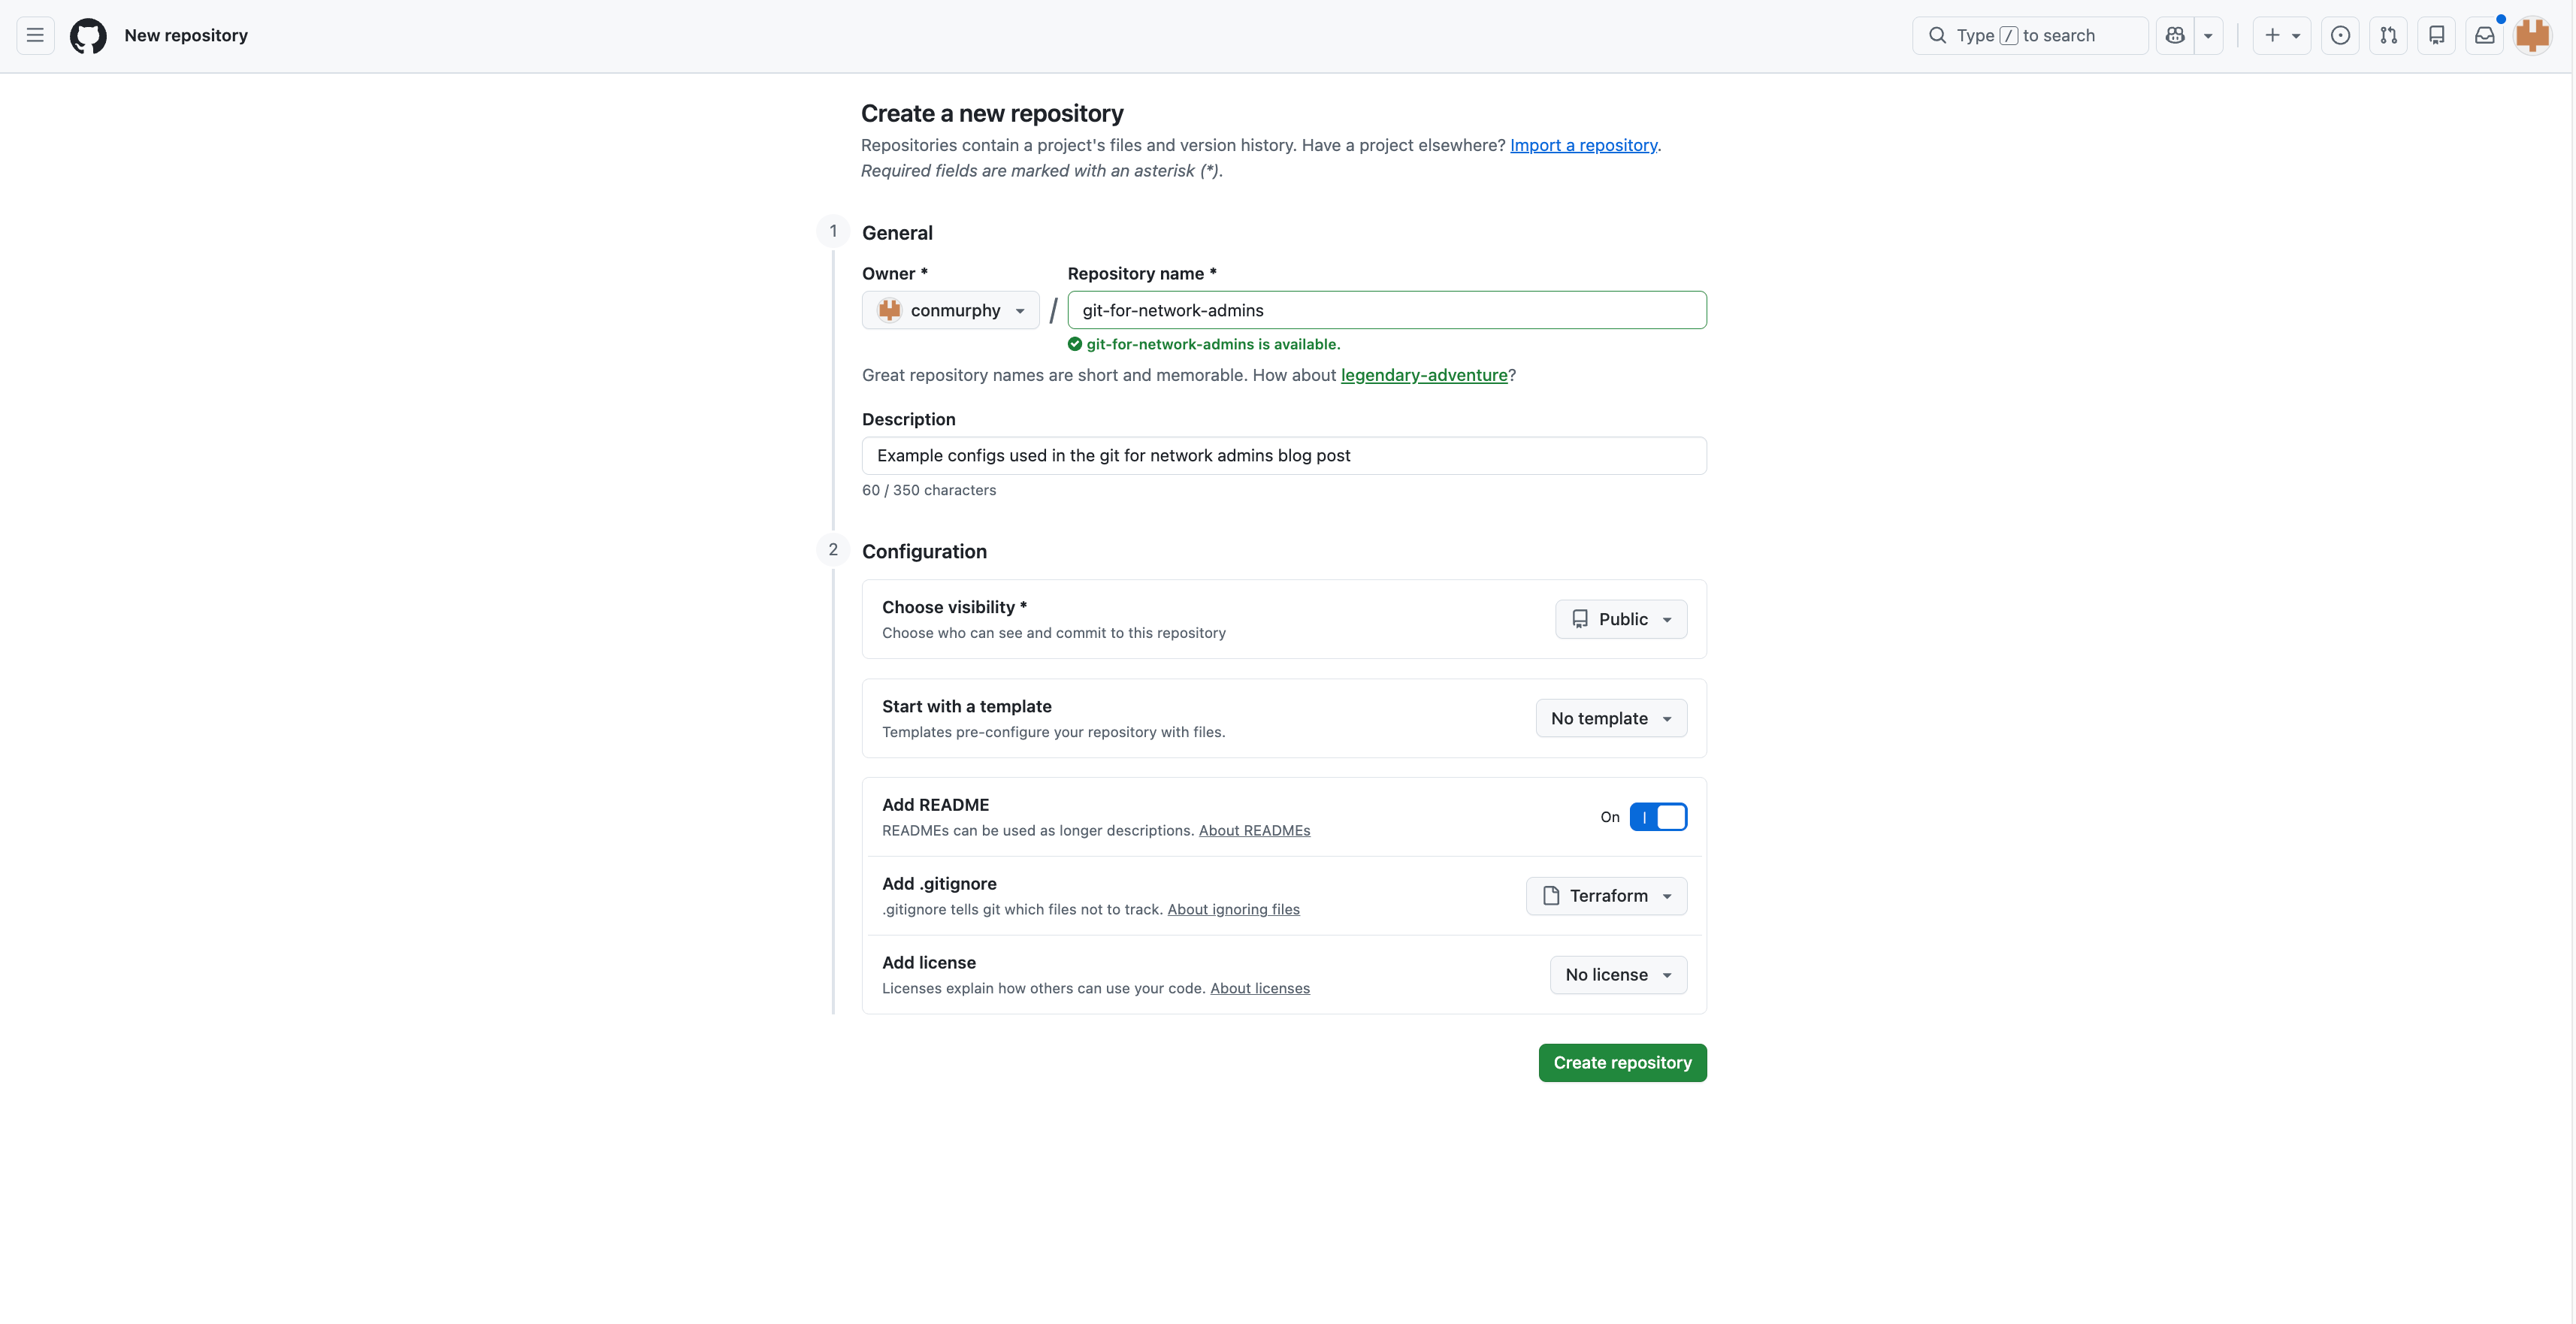
Create the README.md and .gitignore
I like to add the README.md and .gitignore files in the step above screen for a few reasons:
- It's always good to document the purpose of your config, even if it's only for yourself to read 6 months later
- You might forget to add the
.gitignorelater and commit a file you don't want committed. - If you don't create a
README.mdor a.gitignoreyou'll start with an empty repo and will need to follow a few more steps shown here.
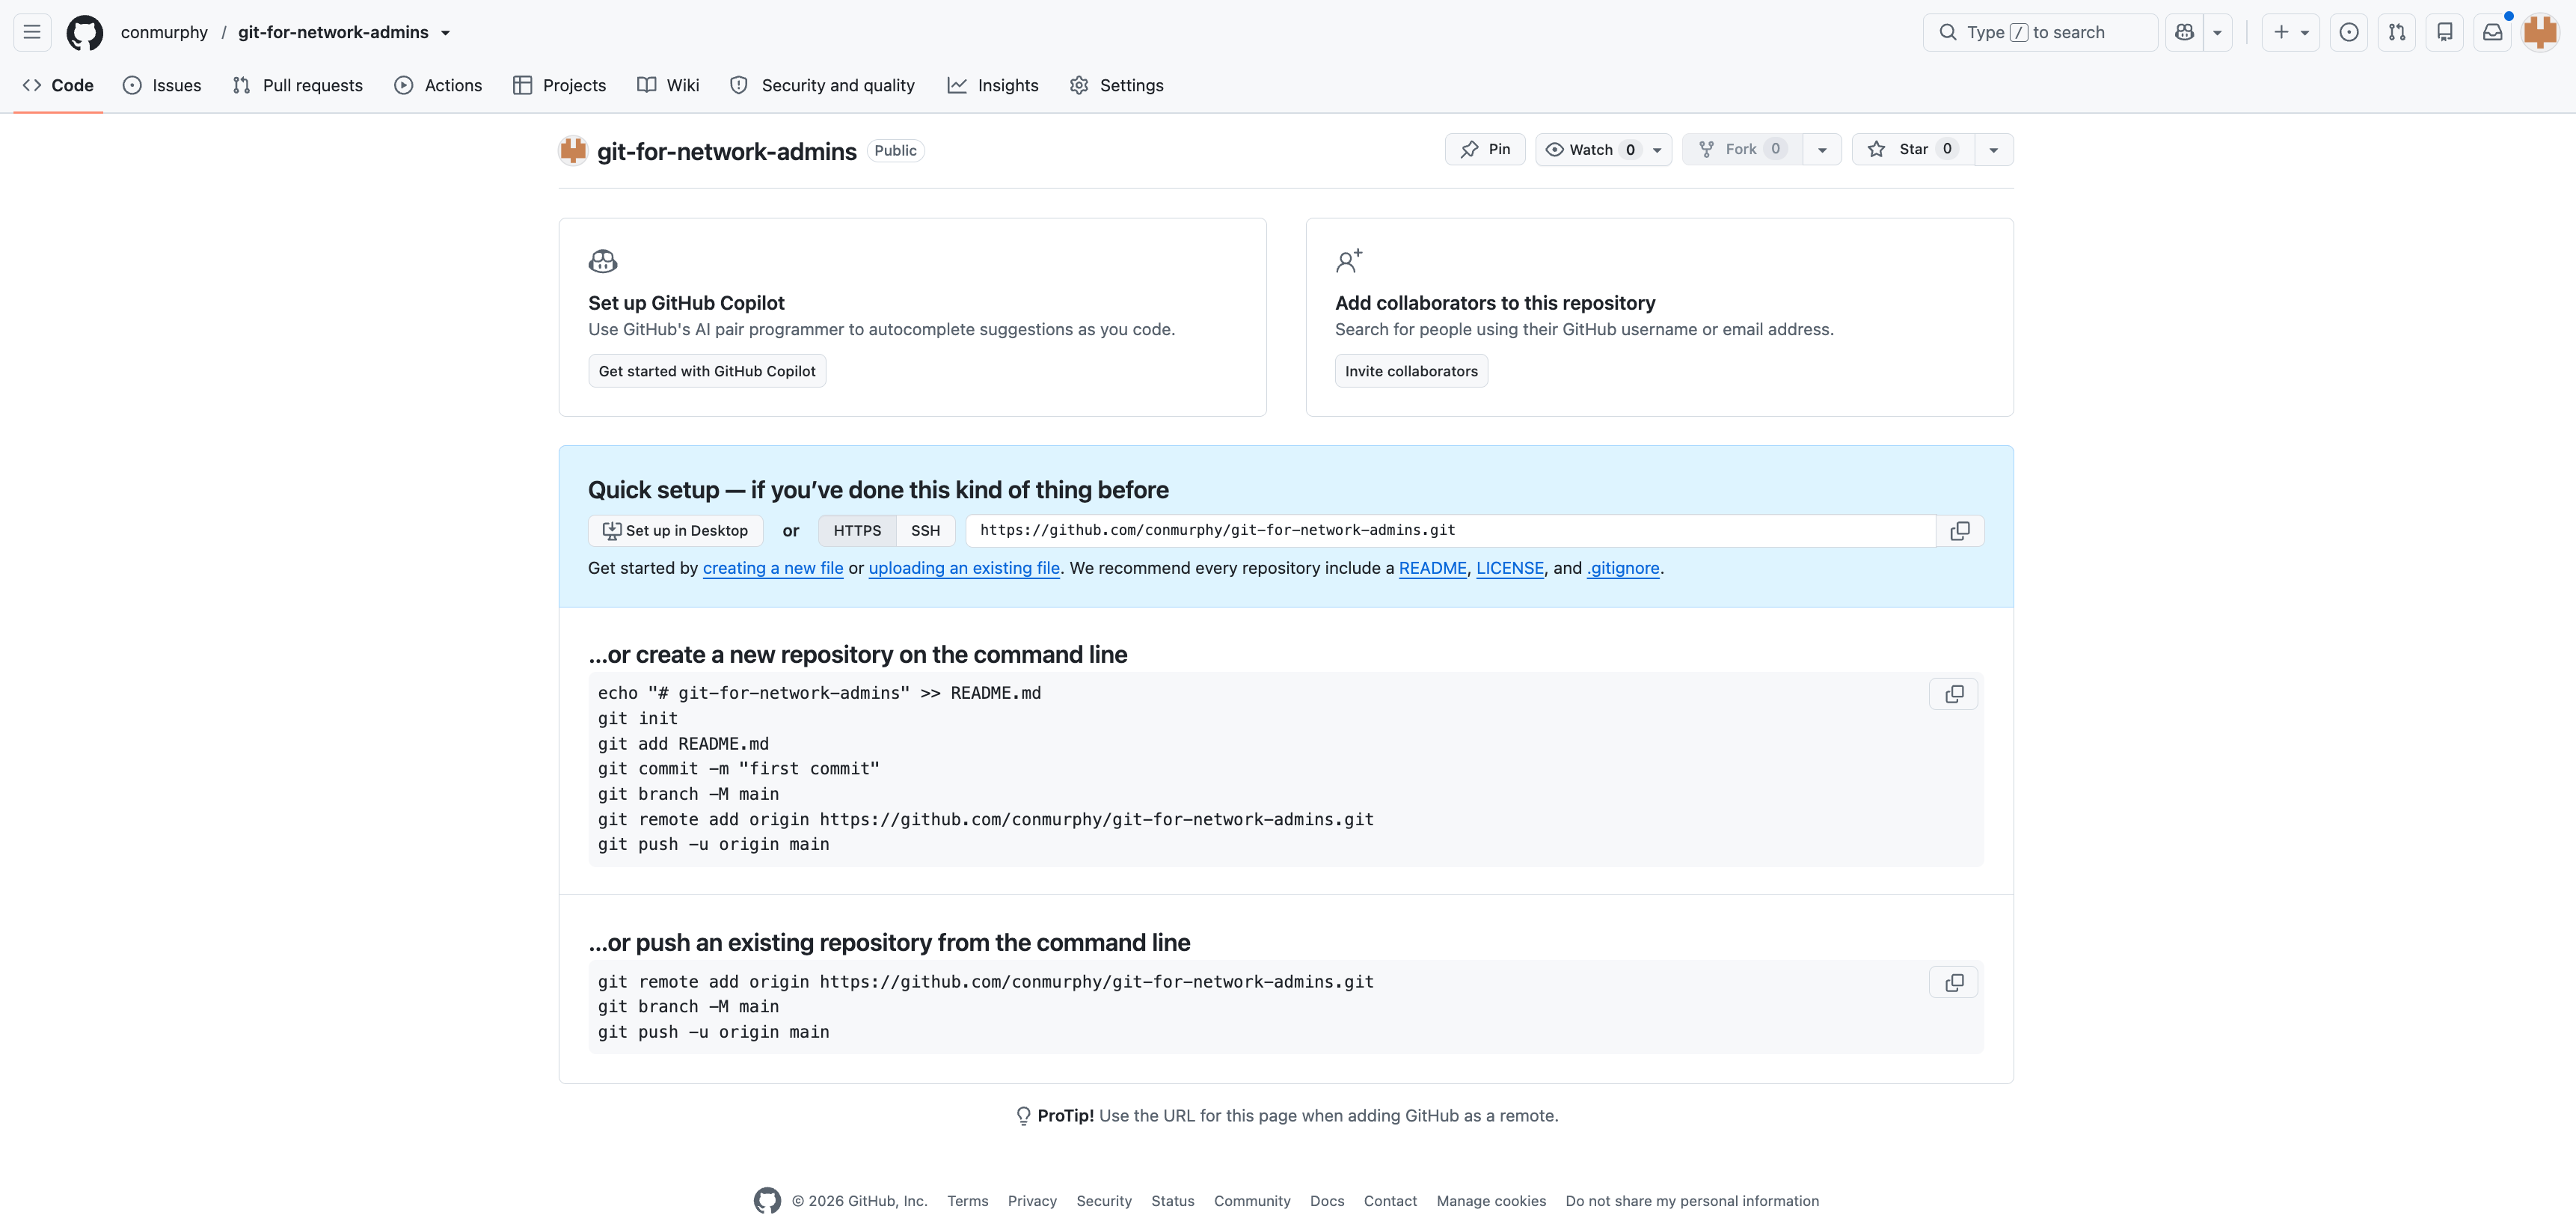
Contributing to an existing repo
You should should have access to a repo; either a new one you created above or an existing one that you want to contribute to. The next step is to get the files to your computer so you can work with them.
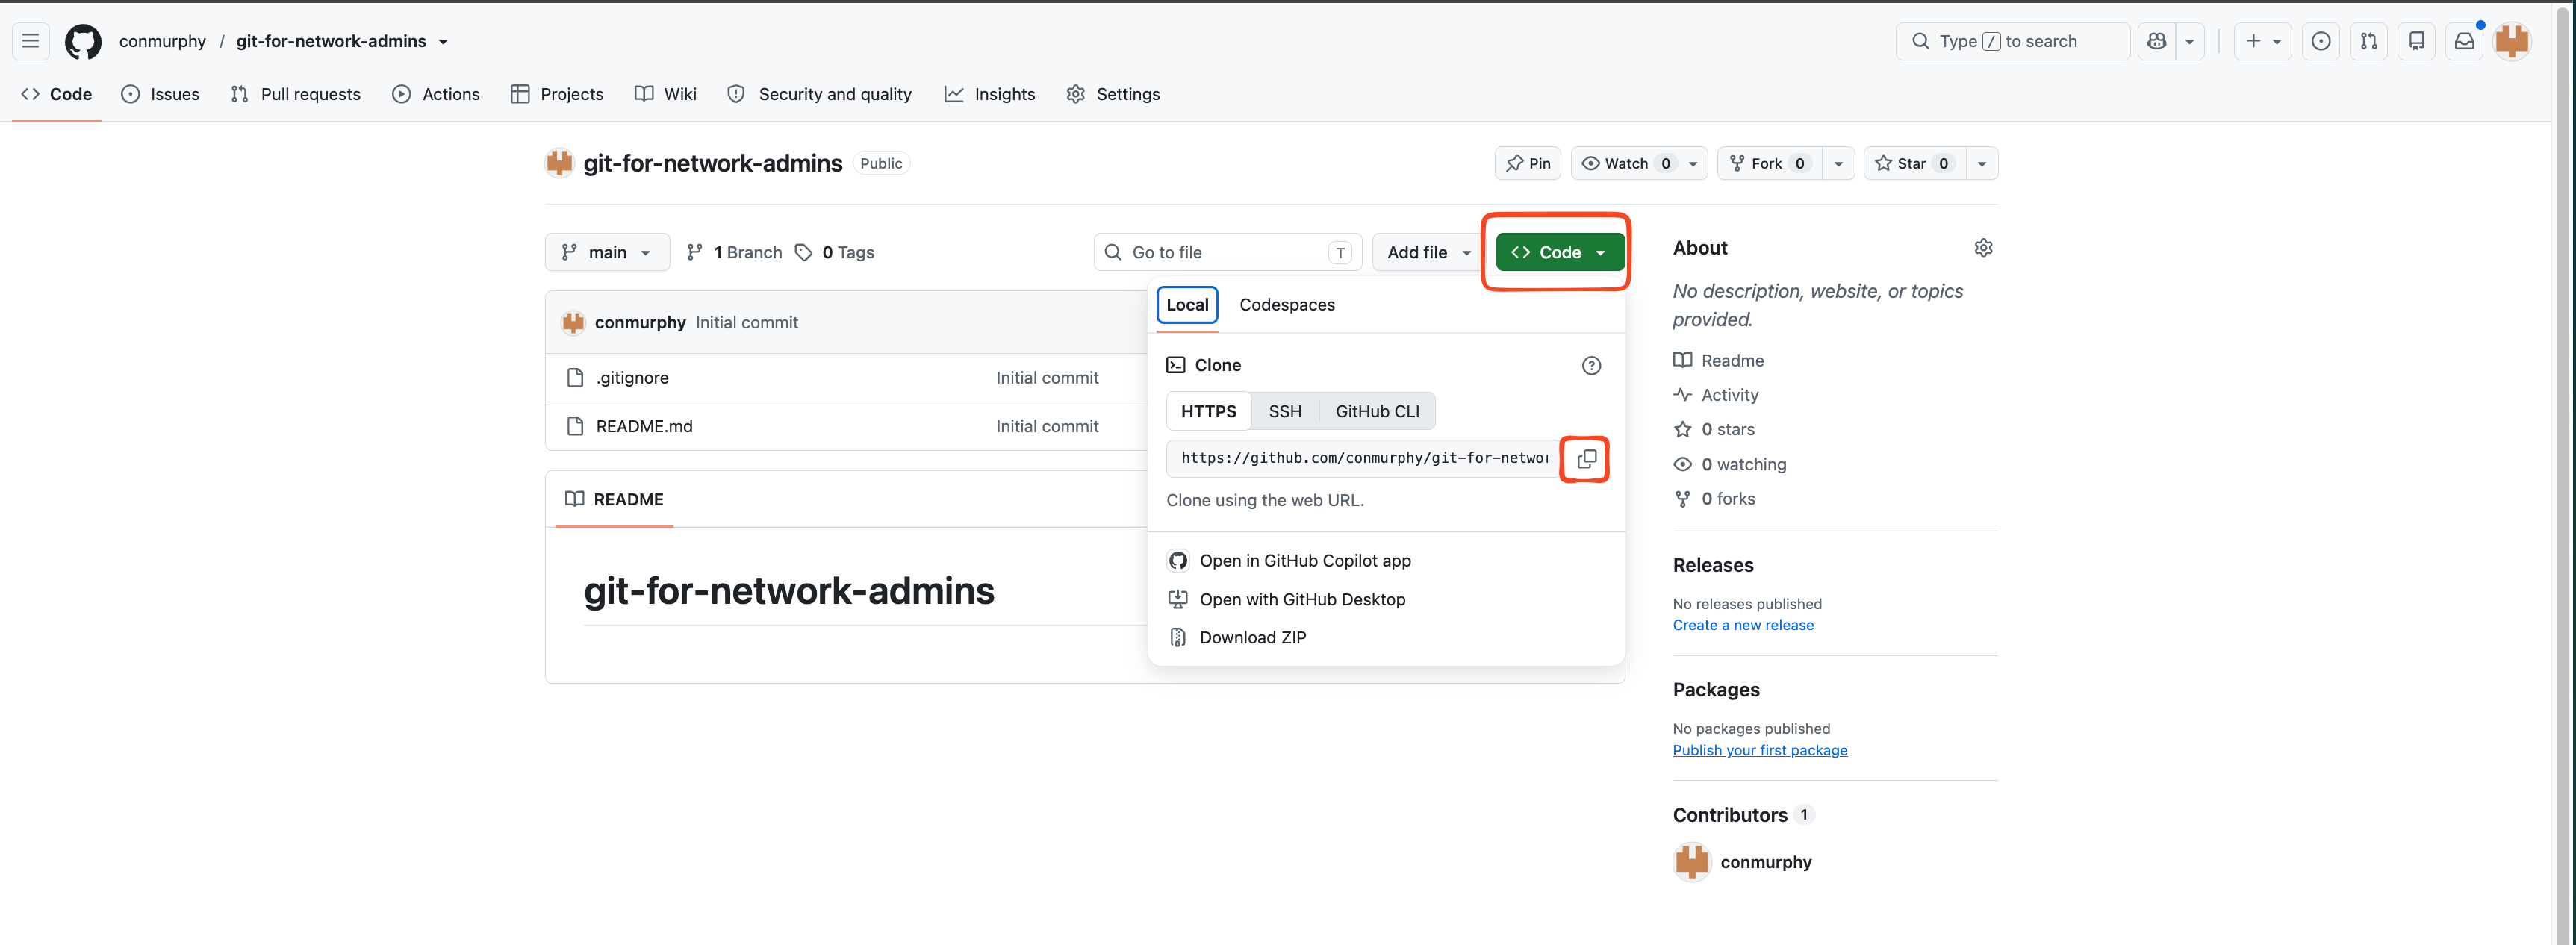
- Click the green
Codebutton and select copy
- Clone the repo to your local machine. This example will create a new folder call
git-for-network-admins
[~/Documents/Vagrant/my_projects]$ git clone https://github.com/conmurphy/git-for-network-admins.git
Cloning into 'git-for-network-admins'...
remote: Enumerating objects: 4, done.
remote: Counting objects: 100% (4/4), done.
remote: Compressing objects: 100% (3/3), done.
remote: Total 4 (delta 0), reused 0 (delta 0), pack-reused 0 (from 0)
Receiving objects: 100% (4/4), done.
[~/Documents/Vagrant/my_projects]$ cd git-for-network-admins
[…/Vagrant/my_projects/git-for-network-admins]$ ls -la
total 16
drwxr-xr-x@  5 conmurph  staff   160 Sep 21 13:05 .
drwxr-xr-x  89 conmurph  staff  2848 Sep 21 13:05 ..
drwxr-xr-x@ 10 conmurph  staff   320 Sep 21 13:05 .git
-rw-r--r--@  1 conmurph  staff  1200 Sep 21 13:05 .gitignore
-rw-r--r--@  1 conmurph  staff    24 Sep 21 13:05 README.md
Cloning to an existing folder
If you manually created a git-for-network-admins folder you can run the following to clone only the files. Note the . at the end of the command
Basic workflow to "save your latest config"
Git Config - Author details
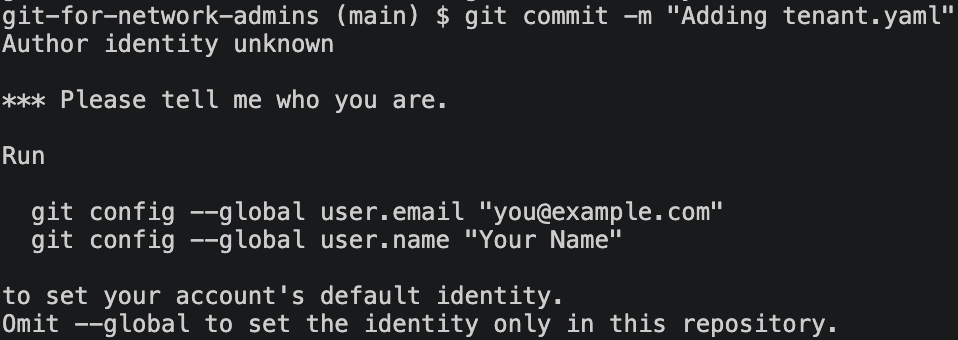
Before going through the steps below, if this is the first time you're using Git you'll probably see the following error when trying to commit.The name/email are required so each commit can be associated with an author and it can also maintain the history. You can use the commands provided to configure the values globally i.e. use the same author across all repositories. Or if you omit --global it will set the author only for the current repo.
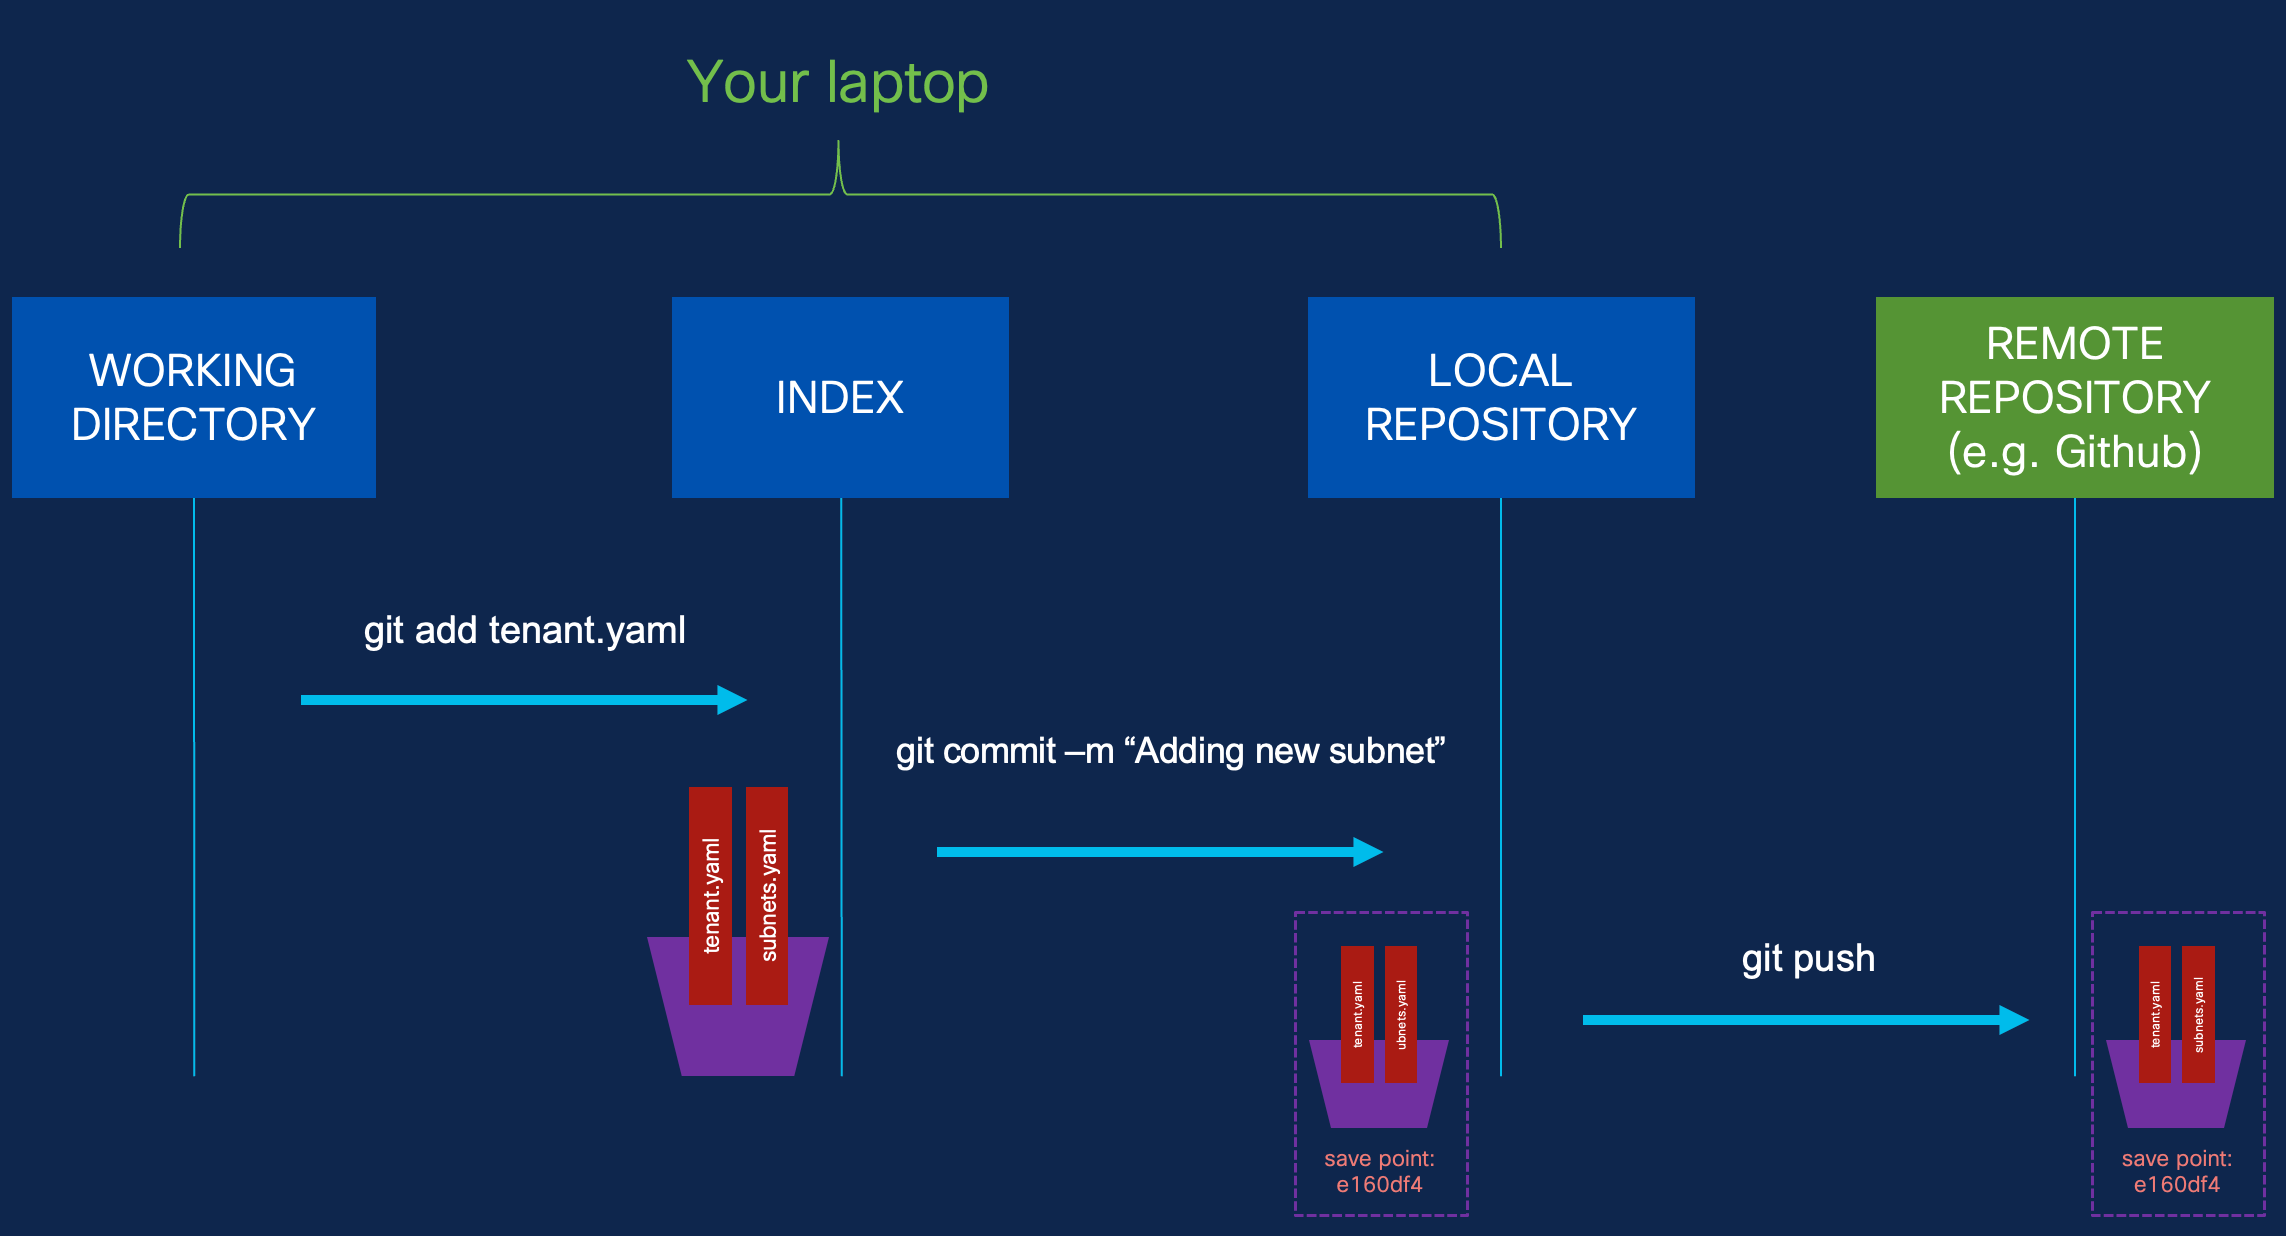
These are the steps you'll need if you want to push your latest file changes to your Github repo.
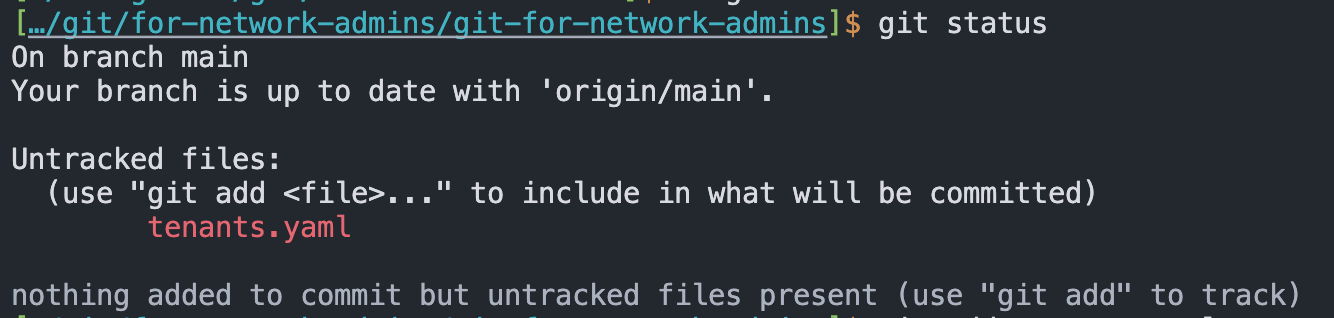
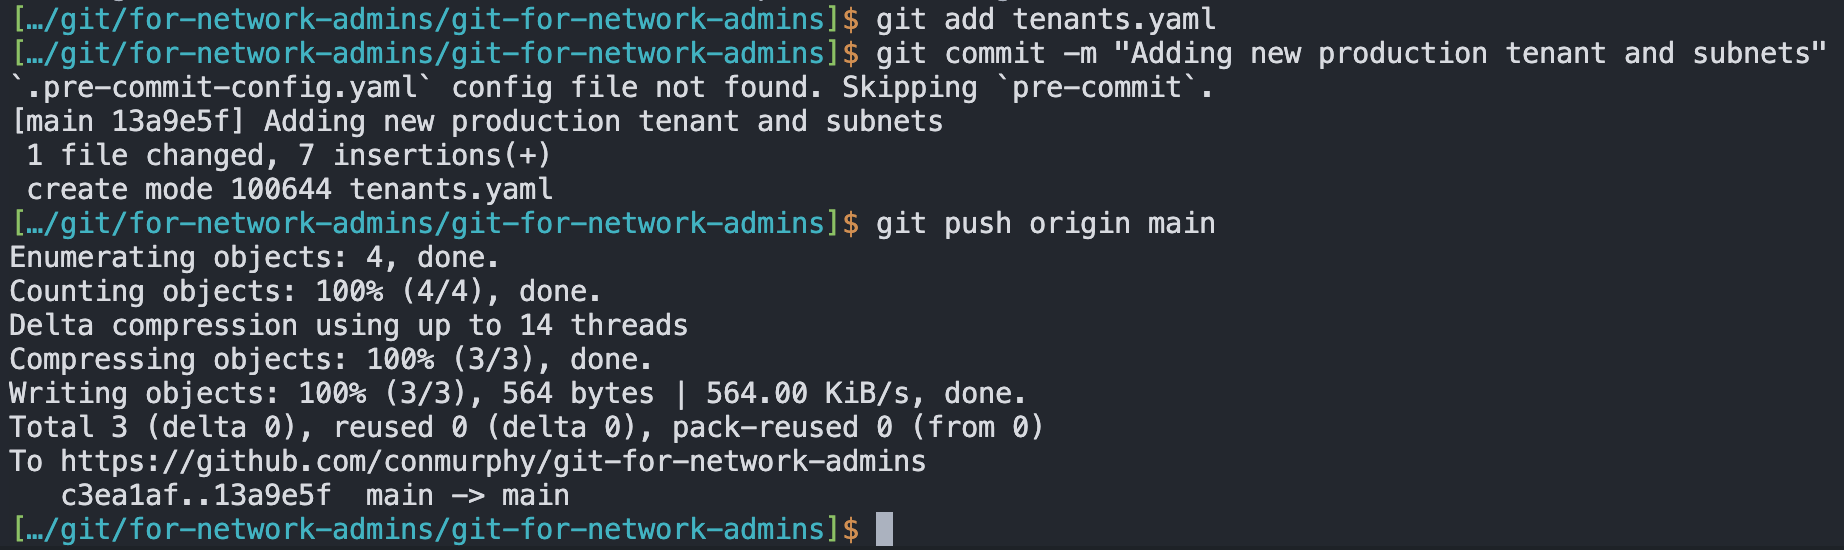
- First have a look at what files have changed (in this example I only have one untracked file).
- tracked are files that Git already knows about and monitors for changes because they were previously committed or staged.
- untracked are new files in the directory that Git does not currently monitor until they are added with
git add.
- Add the changed files and commit. At this point the commit is still on your local machine (i.e. my laptop in this example)
- Push the changed files to the remote repo, in this case it's my repo on Github.
- You should see the commit is pushed and a unique ID is associated (in this example it ends in
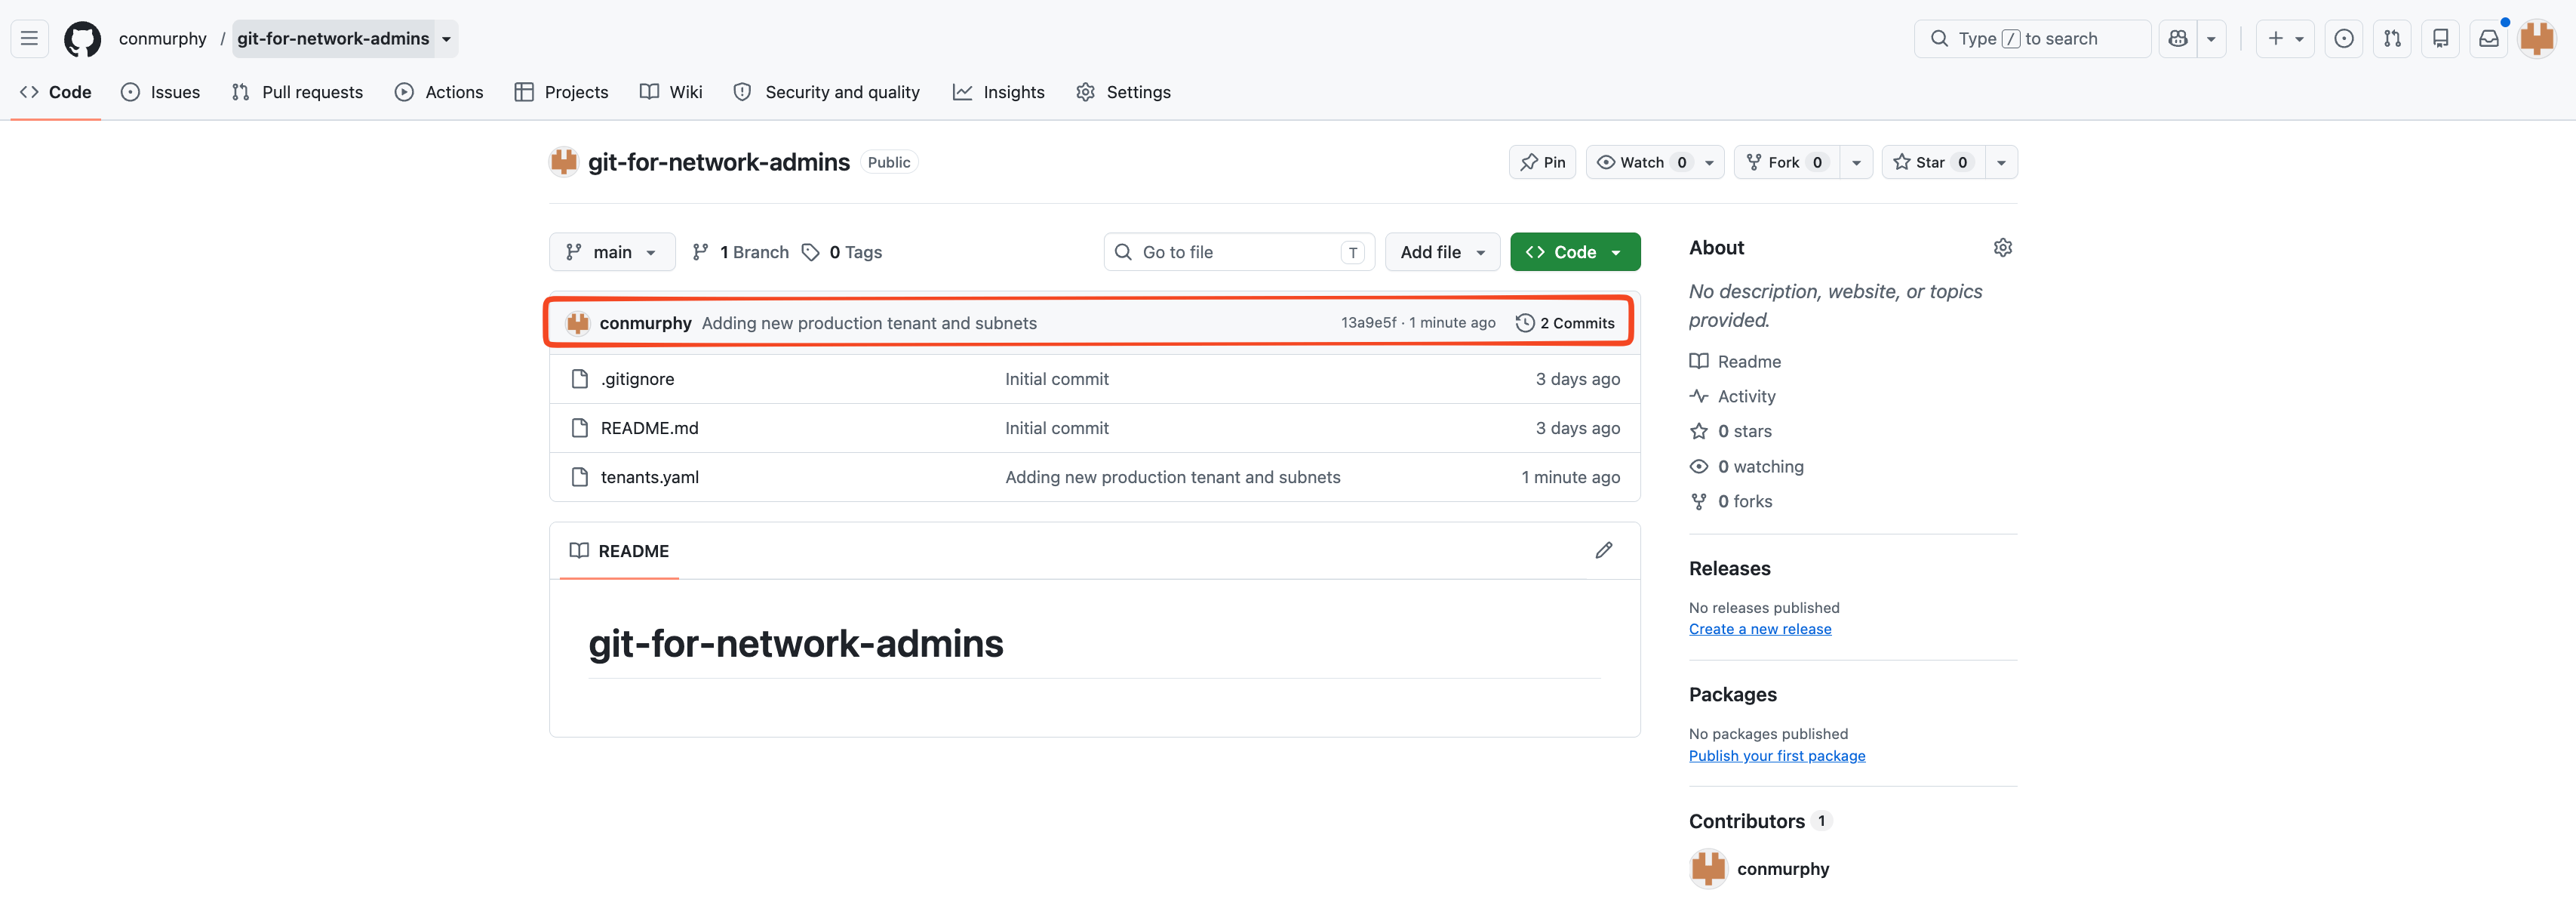
13a9e5f) - When you look at Github you should see the same commit text and the associated ID
What do origin and main mean?
- origin is an alias and points to the URL in Github. This makes it easier than having to type
git push https://github.com/conmurphy/git-for-network-admins main
- main is the name of the branch and it's the default branch name in Github.
Collaborating with your team
Imagine a scenario where you're working with a colleague and you each push changes to the same repo. In order to work together you'll want to have access to the file changes made by your colleague and vice versa. Similar to how git push origin main pushed changes to Github, git pull origin main will pull the changes from Github into the local machine.
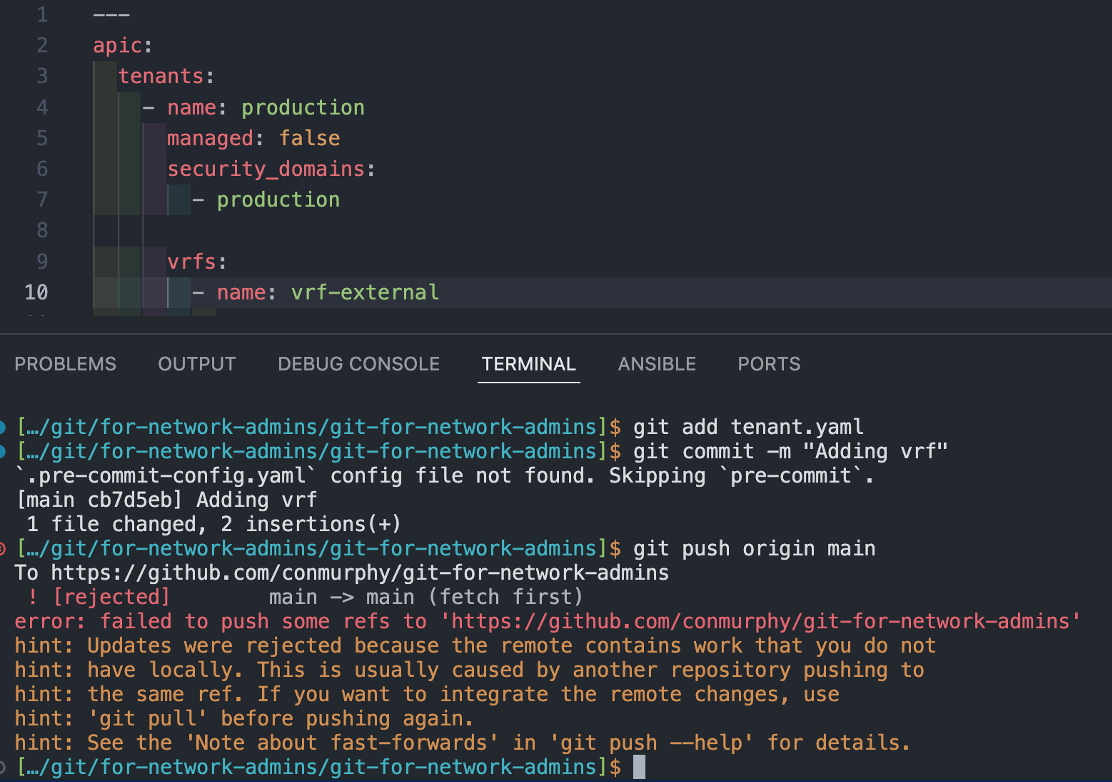
In this case I made one commit locally (added a VRF) while another commit was added to the main branch through the GitHub interface. As a result, the local and remote configs now have different changes based on the same earlier commit. When you run git pull, Git downloads the remote changes but it needs you to decide how the two histories should be combined (especially since some changes may be overlapping).
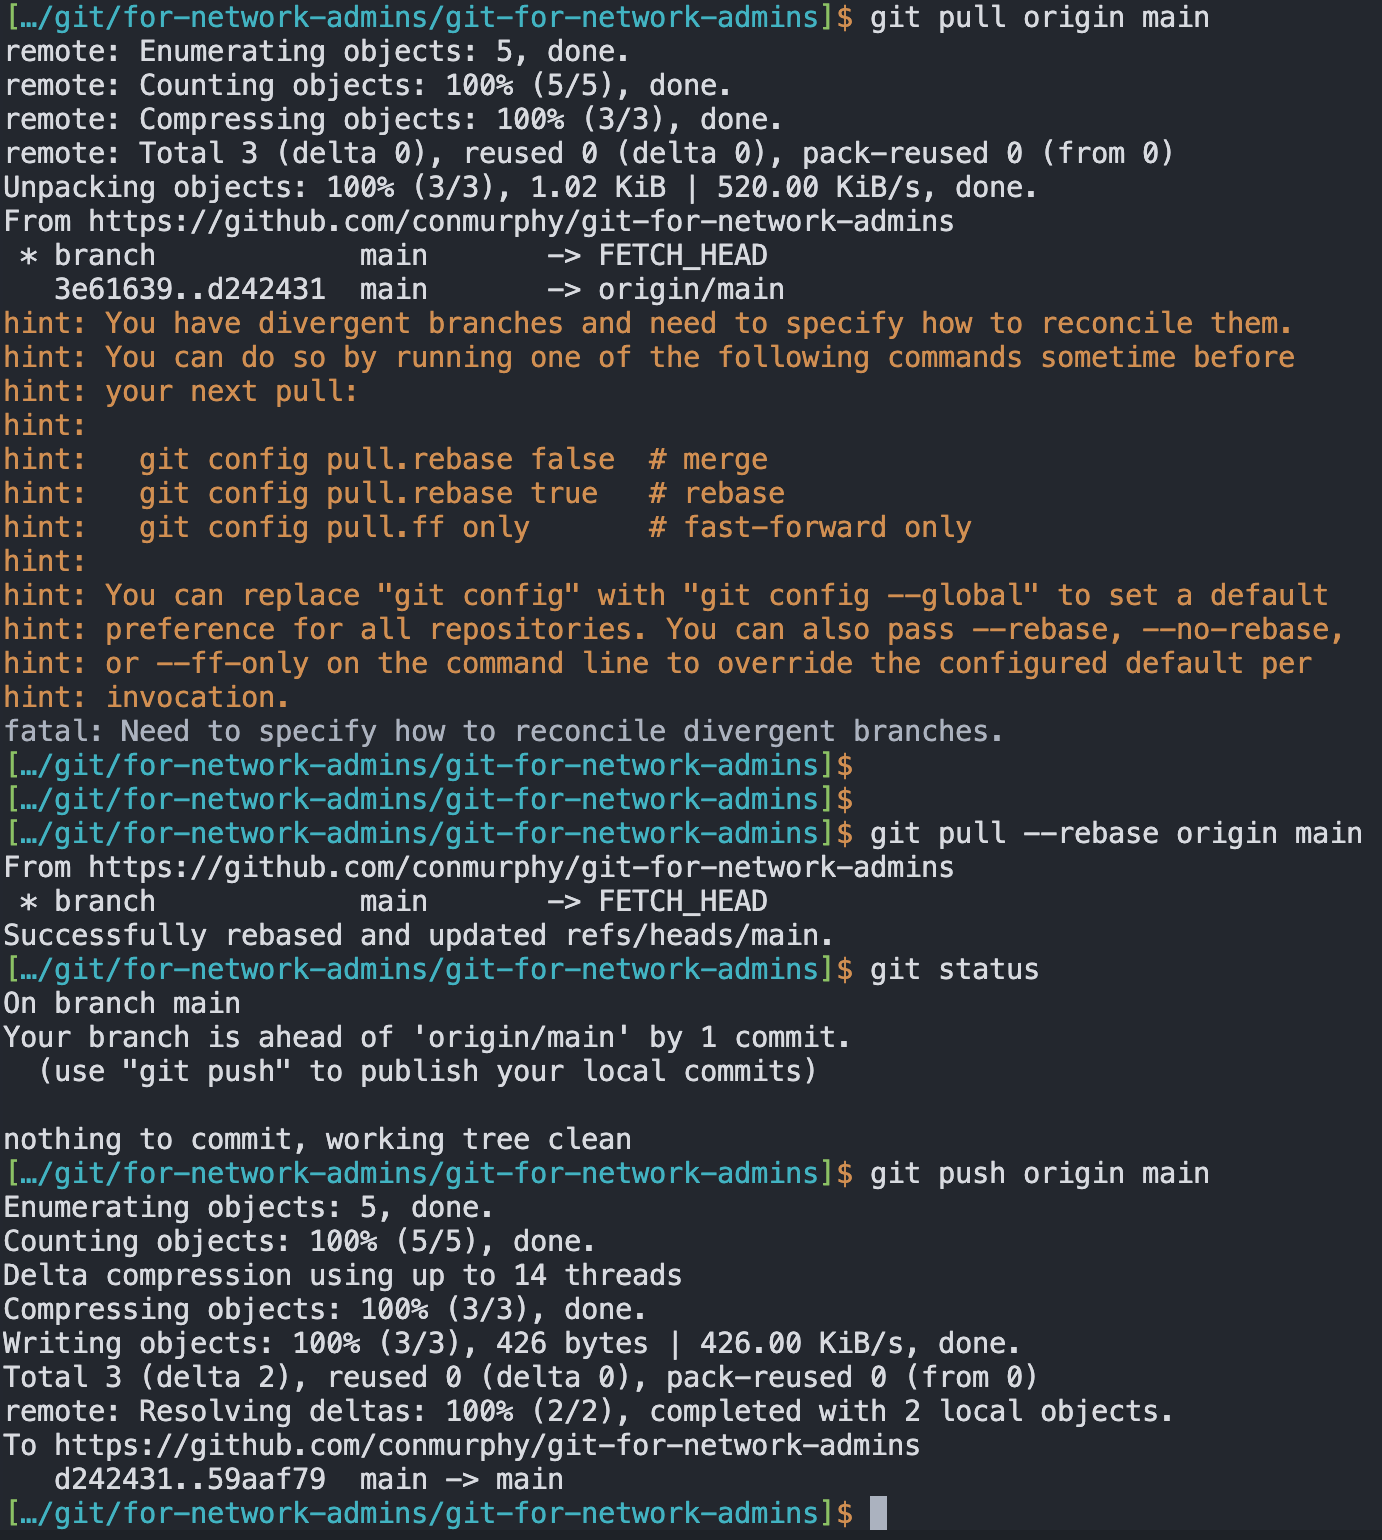
There are different methods for this (merge, rebase, or fast-forward-only) which can result in different outcomes. In this example below I've used git pull --rebase origin main which moves the local commit (C) so that it follows the commit from GitHub (B). When I pull and rebase the changes, I can then git push my local commit to Github.
One day I may update the post in the future with a comparison of each or might make a new one.
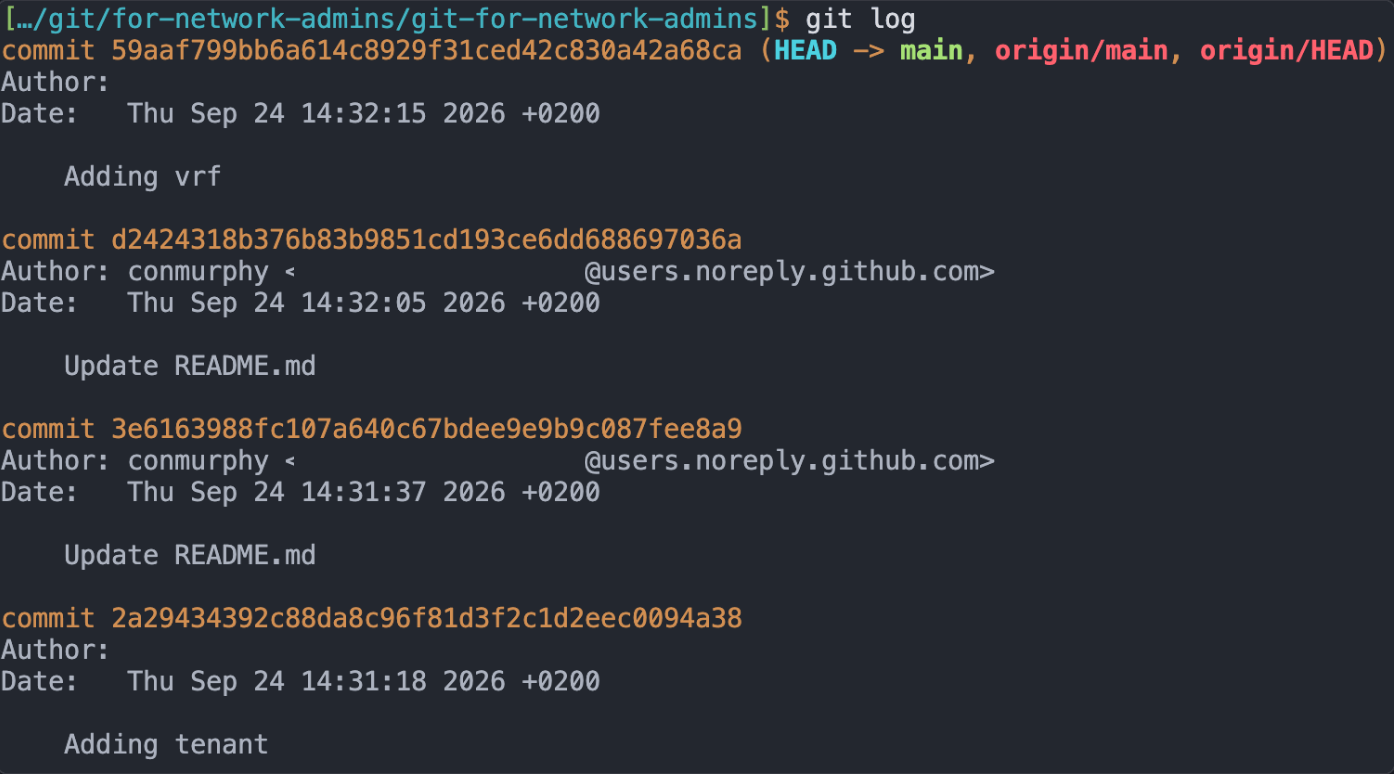
You can use git log to see the commit history and git log --graph --oneline --decorate --all if you just want single lines. In the first example the @users.noreply.github.com user is the commit made through the Github UI

Rolling back changes
There are a couple of options depending on at what point you need to rollback.
- You've made a change locally but haven't pushed the change to Github
- You've pushed a change to Github and now need to rollback to the previous commit
The second scenario is quite common when using a Gitops process for network automation. I've written about what can happen if you don't have a single source of truth and start making changes from APIC and Terraform.
For example in the scenario, rather than rolling back a snapshot through the ACI APIC, we would rollback the configuration through Git and then re-run the Terraform apply. This ensures the correct Terraform state is maintained.
Here are some scenarios and the relevant commands.
| Scenario | Recommended command | Result |
|---|---|---|
| You've added a file you shouldn't have but you haven't yet committed | git restore --staged <file> |
Removes the file from the staged list |
| Your local commit hasn't been pushed and you want to undo the add/commit steps | git reset HEAD~1 |
Removes the latest commit |
| You pushed the latest commit to Github | git revert HEAD |
This creates a new commit that reverses the latest commit while preserving the history |
Local changes (not yet pushed to Github)
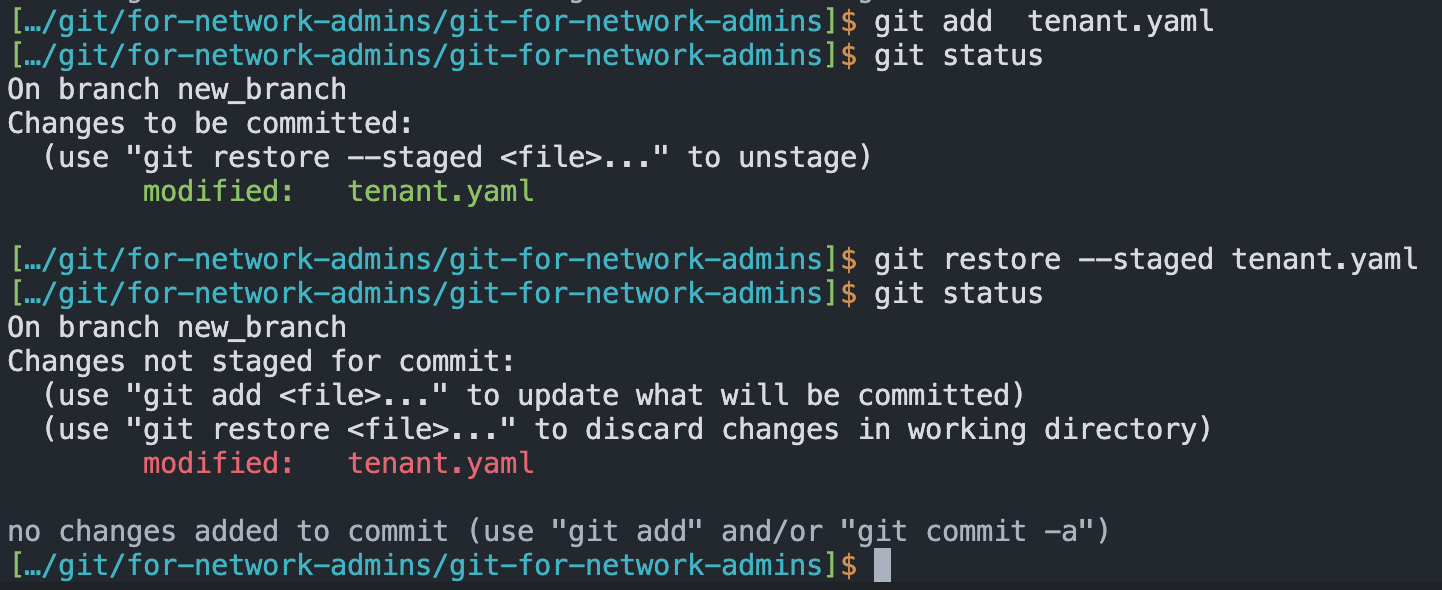
If you added a file but didn't yet run git commit and now want to unstage the file, you can run the git restore --staged command. For example, in the picture below I can run git restore --staged tenant.yaml to unstage/unselect the files I want to commit
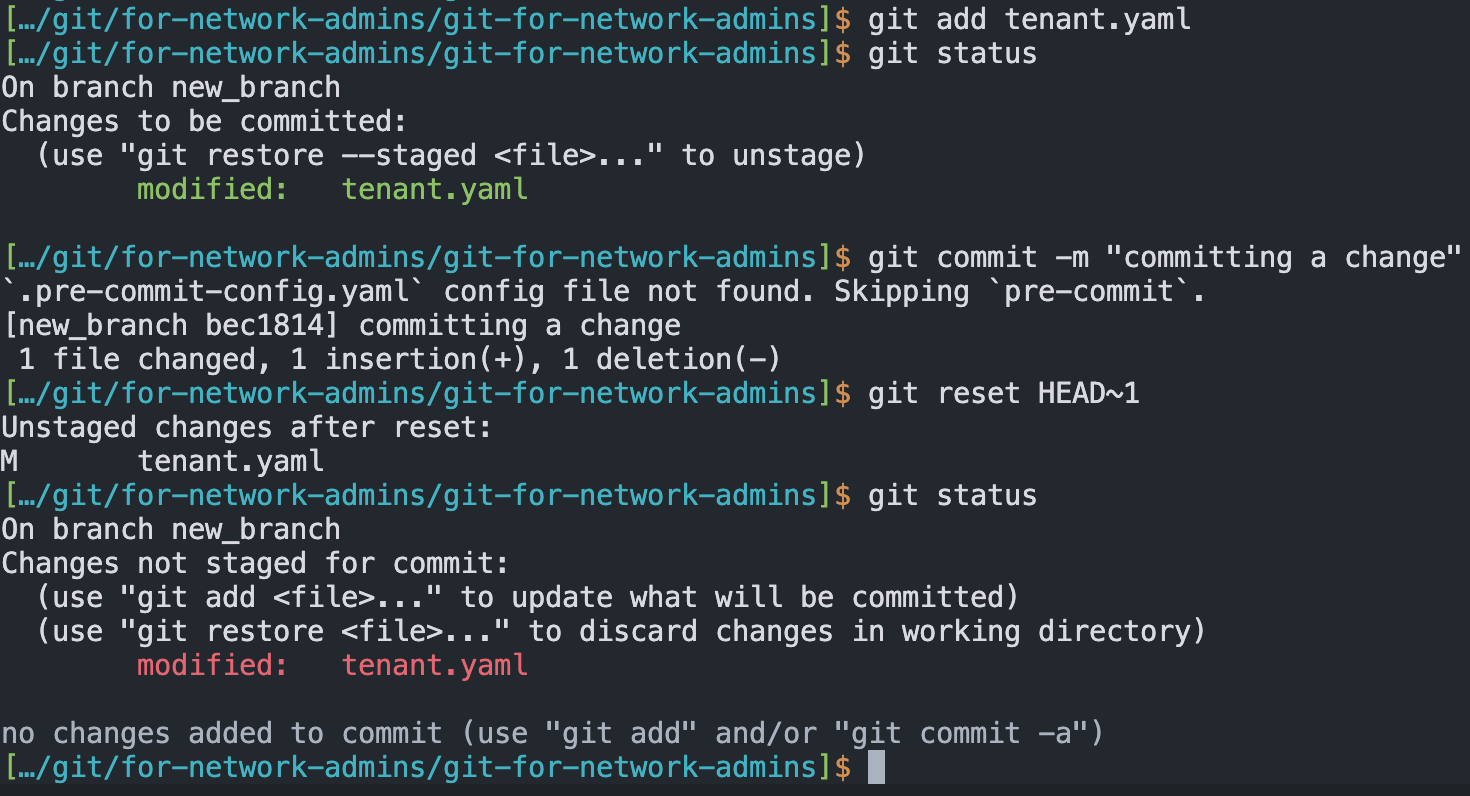
If you already ran the git commit command and now want to undo it for some reason (e.g. change the commit message, unstage a file) you can use git reset HEAD~1. This
This will undo the add/commit steps so you can start again.
Changes pushed to Github
What's the reason for the rollback?
If you are rolling back a change because you pushed secrets (e.g. your switch credentials) then the following won't help. You should be rotating the secrets which were pushed as they're now compromised
Since this post is to help network admins I'm assuming this scenario is an example where a network change was made, it was incorrect, and now the change needs to be rolled back.
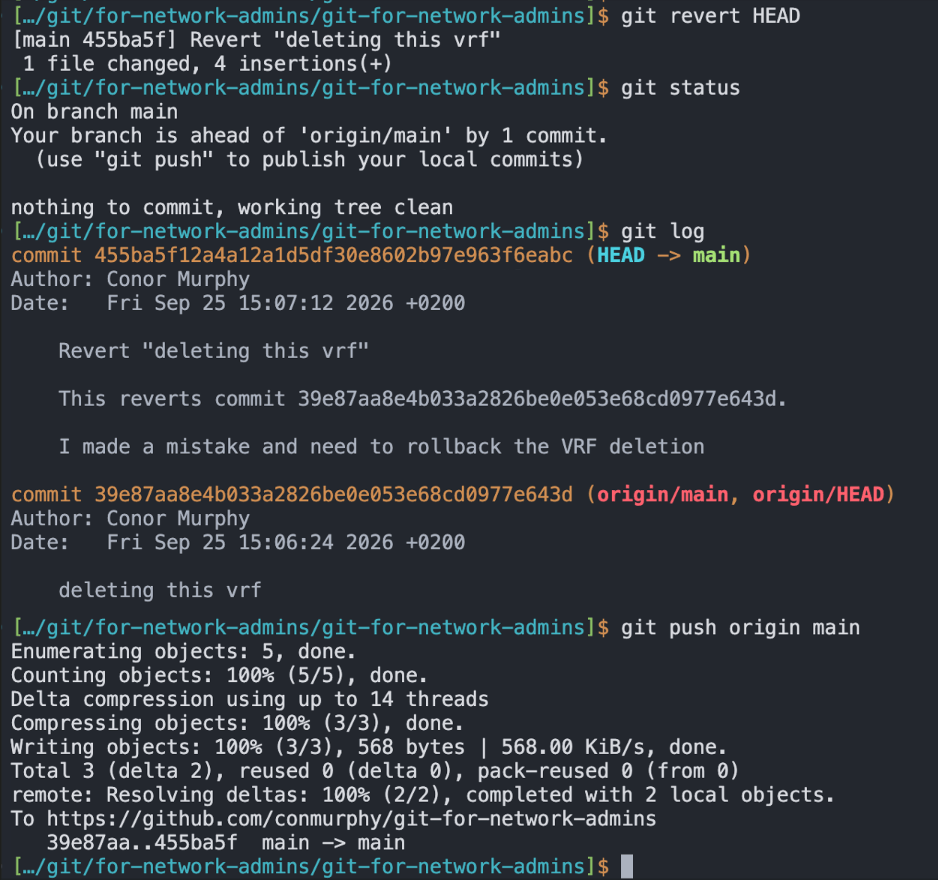
Use git revert HEAD if the commit has been pushed to Github. This command creates a new commit that reverses the previous commit/push while preserving the history.
Although not shown in this post, imagine I'm using Terraform to apply this change, I would run terraform apply and then push the new config to Github for version control. In the example below you can see that I deleted my VRF config from the YAML file and then pushed the change.
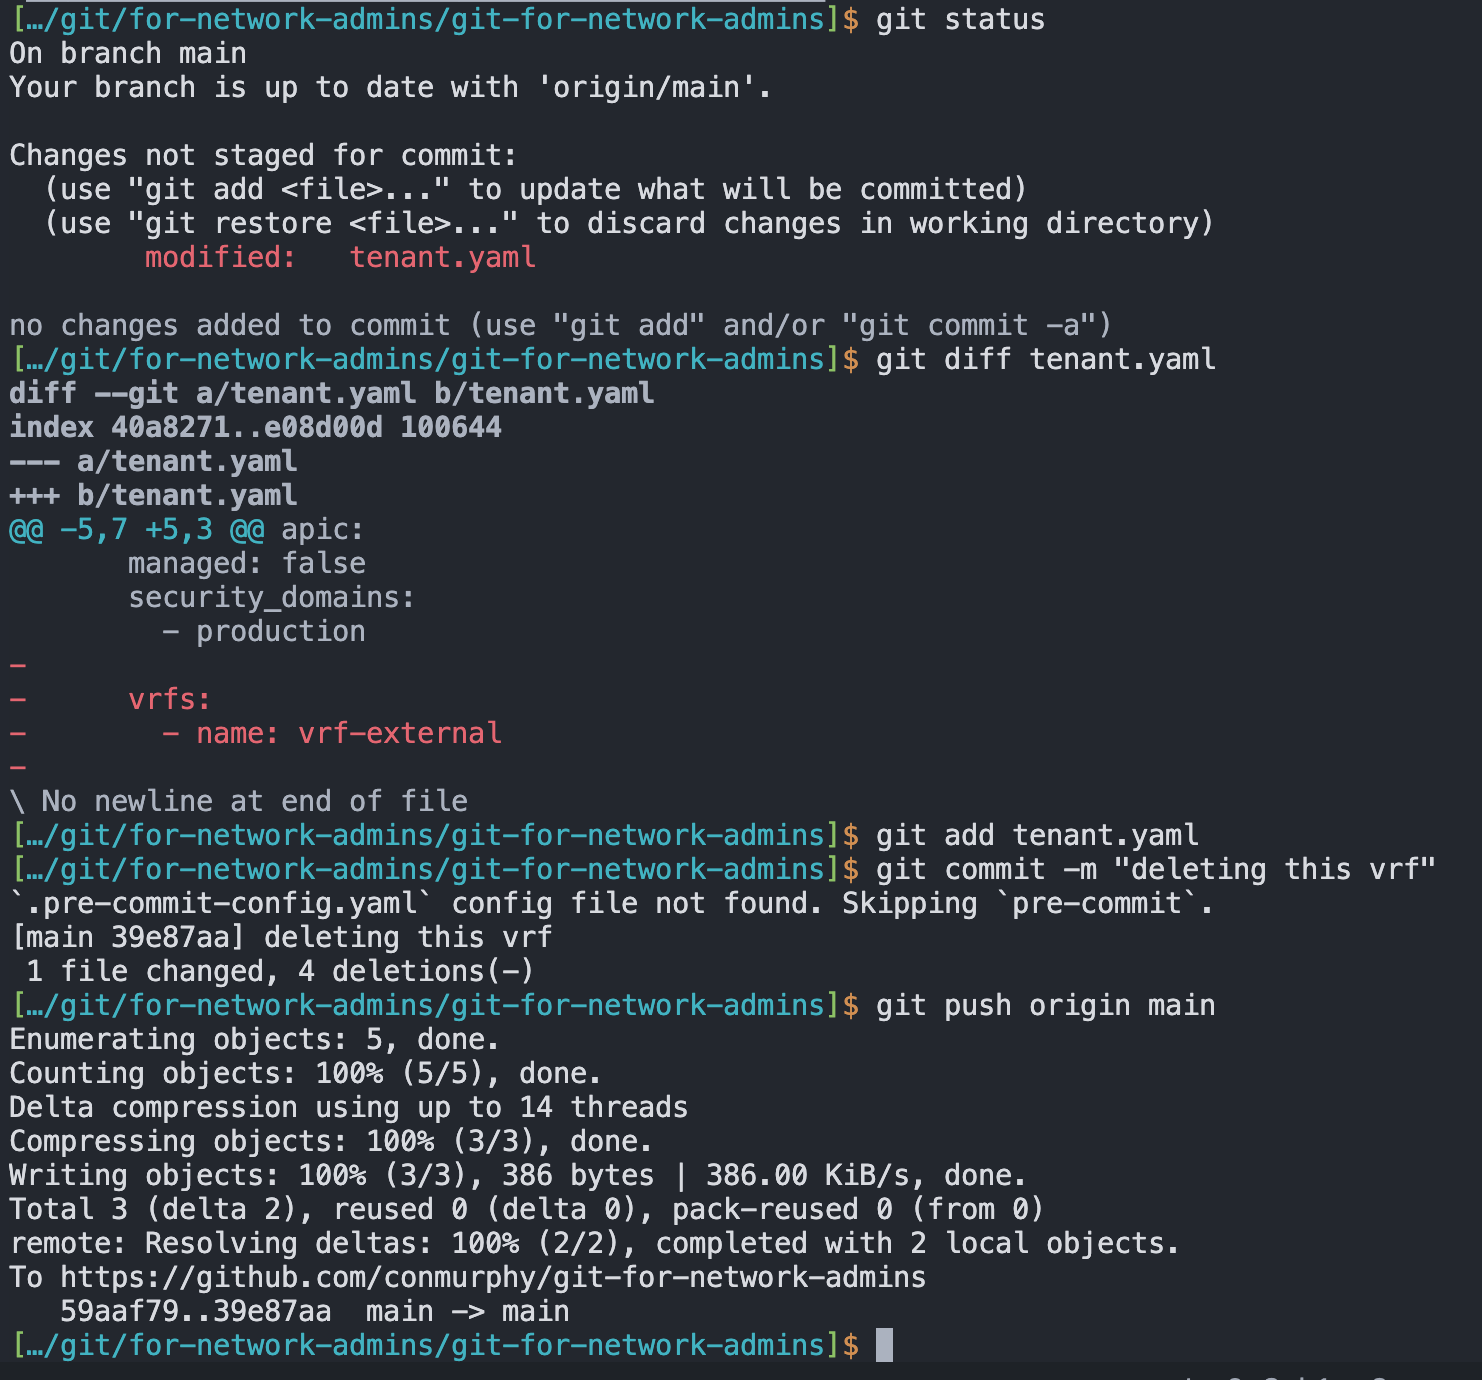
Then I realise I've made a config error and need to rollback the config. I use git revert HEAD which basically copies the previous config (before I deleted the VRF) and runs the add/commit steps. I can then run git push origin main to push the "rolled back" change. In my Terraform example I'd then run terraform apply to reconfigure the VRF.
Commit C is where I deleted the VRF. Now I need to rollback with git revert HEAD
After git revert HEAD I now have a new commit R. The files in R have the same content as commit B. Notice that commit C still exists which is why this won't undo pushing secrets and you should always assume these are compromised.
Writing the commit message
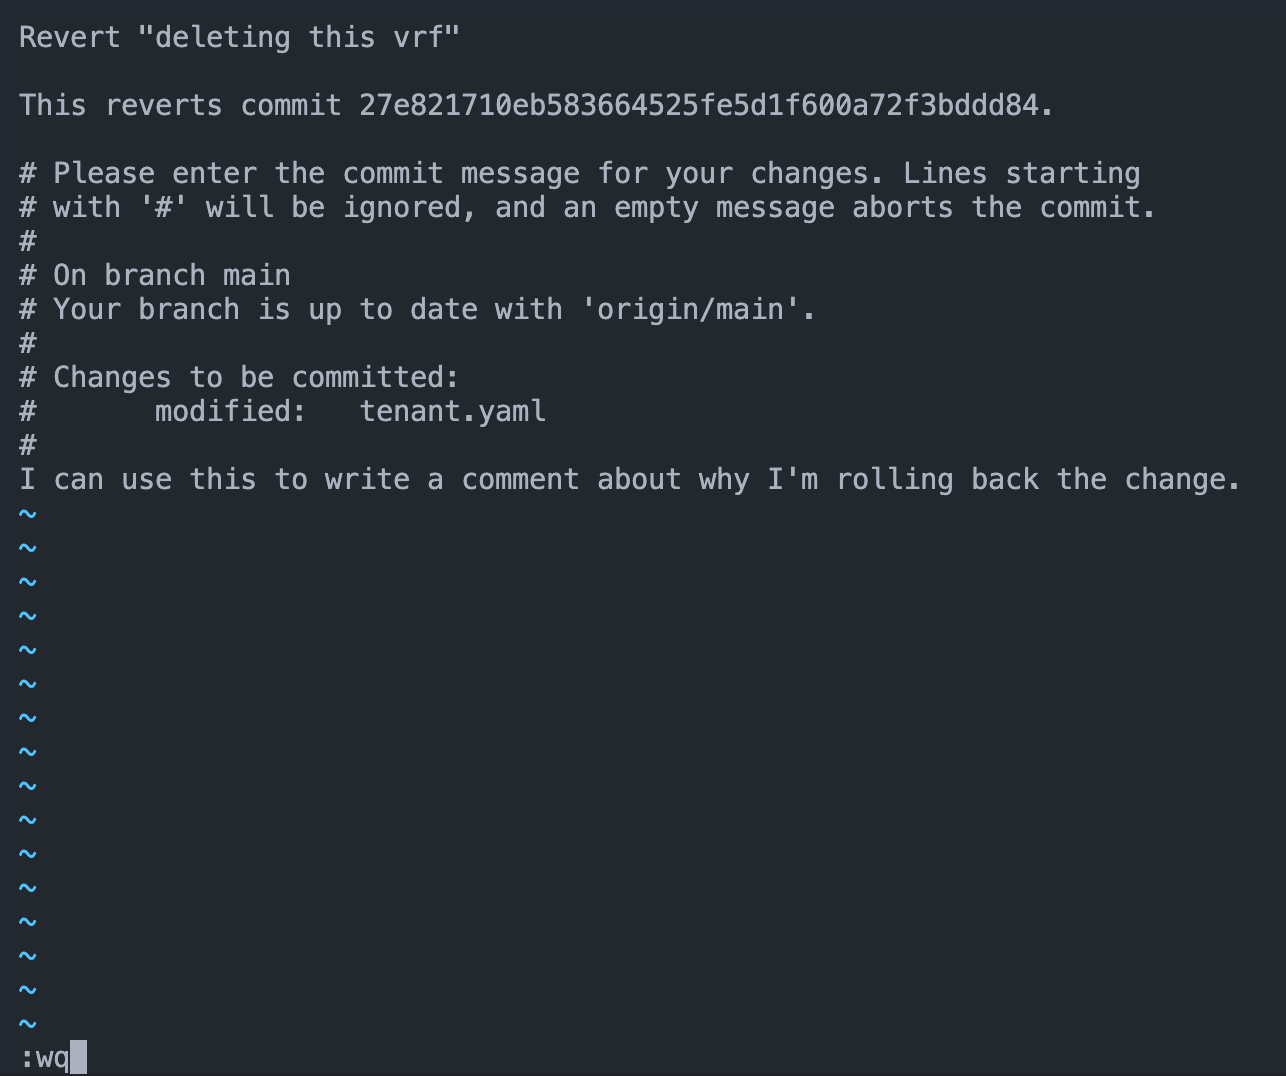
You need to create a new commit when you run git revert HEAD and so you might see this screen. This is showing the default editor (vi in my case) which you can use to write the commit message. Here are the steps I use:
- Escape key
ikey- Write the commit message
- Escape key
:wqfor write (save) and quit
Common Git Terminology
| Term | What is it |
|---|---|
| Repository (repo) | A directory that Git tracks. In this NaC example I have the config in YAML + .tf Terraform files |
| Local repository | The copy of a repository stored on your computer |
| Remote repository | A copy hosted on a server or service such as GitHub or GitLab |
| Stage | Select a change for inclusion in the next commit, usually with git add |
| Commit | A saved snapshot of your staged changes (on your local machine), including an author, date, message, and unique ID |
| Commit ID (hash) | A unique identifier assigned to a commit, such as 13a9e5f |
| Branch | An independent "workspace" that allows changes to be made without immediately affecting another branch |
main |
The typical name for the primary branch of a repository. Some older repos use master |
HEAD |
This is a pointer to the branch you have checked out (you'll see HEAD -> main in the logs above). If you created and check out a new branch called adding_subnet and run git log you should see HEAD -> adding_subnet |
| Origin | The default short name Git usually assigns to the remote repository from which you cloned e.g. the Github Git URL |
| Clone | Create a local copy of an existing remote repository using git clone |
| Tracked file | A file Git already knows about and monitors for changes |
| Untracked file | A file in the repository directory that Git is not currently tracking |
| Push | Upload your local commits to a remote repository such as GitHub |
| Pull | Download remote changed files and integrate them into your current branch. A pull normally performs a fetch followed by a merge or rebase |
| Merge conflict | A situation where Git cannot combine changes automatically, such as when the same line was changed differently. YOu'll need to tell Git which of the changes you want to keep |
| Checkout | Switch to another branch or restore selected files. Modern Git also provides git switch and git restore |
.gitignore |
A file containing patterns for files Git should not track, such as logs, temporary files |
| Pull request (PR) | A request to review and merge changes from one branch into another. It is a feature provided by GitHub |